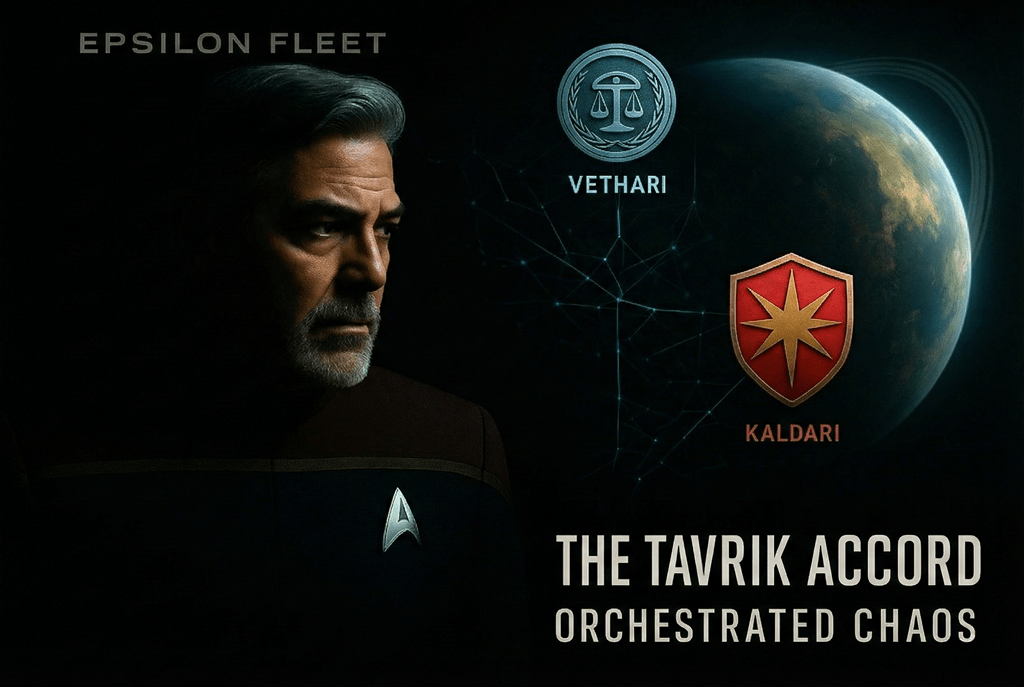
The Tavrik Accord: Orchestrated Chaos
Click the image to open the gallery
Mission Info
| Status | Current Mission | |
| Description | When diplomat Stephen MacCaffery arrives at Tavrik III to negotiate peace between the Federation, hostile Kaldari militarists, and evasive Vethari traders, he expects heated arguments, not murder. |
|
| Start Date | Sun Dec 7th, 2025 @ 3:58pm | |
| End Date | Sat Feb 28th, 2026 @ 3:58pm | |
Mission Posts
| Title | Timeline | Location |
|---|---|---|
|
Tavrik Accord: Peace with Dignity Part 2 by Commodore Stephen MacCaffery |
Island Chain Seven (“The Lanterns”), Tavrik III | |
|
Tavrik Accord: Peace with Dignity Part 1 by Commodore Stephen MacCaffery |
Island Chain Seven (“The Lanterns”), Tavrik III | |
|
Fatherhood by Commodore Stephen MacCaffery |
VIP Guest Quarters 217, USS Valley Forge | |
|
The Prosecution by Commodore Stephen MacCaffery |
The Shattered Conference Hall (formerly “The Golden Cage”) | |
|
Counterbalance by Vice Admiral Sidra MacLaren |
In the middle of Bearing Part III. | USS Caelestis |
|
THE COURT OF ASH by Commodore Stephen MacCaffery |
The Crater (formerly Logistics Warehouse 4), Island Chain Seven, Tavrik III | |
|
Mackenzie’s Gambit: Inferno on Island Chain Seven by Commodore Stephen MacCaffery |
Logistics Warehouse 4 & Command Perimeter, Island Chain Seven< | |
|
THE AUTOPSY OF A LIE by Commodore Stephen MacCaffery |
Medical Bay & Secure Command Node, Island Chain Seven, Tavrik III | |
|
The Fox in the Henhouse by Commodore Stephen MacCaffery |
Time: Day 3, Morning (0800) | Science Annex & North Perimeter, Island Chain Seven, Tavrik III |
|
The Art of the Trap by Commodore Stephen MacCaffery |
Staff Quarters, Block C / Conference Pavilion | |
|
Lockdown at Tavrik III: The Cavalry Arrives by Commodore Stephen MacCaffery |
OOC Note: This takes place after Stephen talks to Sidra and before Frankenstein . | Temporary Command Bungalow / Orbit of Tavrik III |
|
Frankenstein's Weapon Part 2 by Commodore Stephen MacCaffery |
Provisional Science Annex, Island Chain Seven, Tavrik III | |
|
Frankenstein’s Weapon Part 1 by Commodore Stephen MacCaffery |
Provisional Science Annex, Island Chain Seven, Tavrik III | |
|
Burning The Midnight Oil Part 2: Trouble In Paradise by Vice Admiral Sidra MacLaren & Commodore Stephen MacCaffery |
Temporary Command Bungalow, Island Chain Seven, Tavrik III | |
|
The Aftermath: The Silence After the Toast Part 2 by Commodore Stephen MacCaffery |
Diplomatic Medical Suite, Island Chain Seven Complex, Tavrik III | |
|
The Aftermath: The Silence After the Toast Part 1 by Commodore Stephen MacCaffery |
Diplomatic Medical Suite, Island Chain Seven Complex, Tavrik III | |
|
THE TOAST AND THE TOXIN by Commodore Stephen MacCaffery |
Reception Pavilion, Island Chain Seven, Tavrik III | |
|
THE PEACOCK AND THE PANTHER Part 2: The Breath of Welcome by Commodore Stephen MacCaffery |
Island Chain Seven (“The Lanterns”), Tavrik III | |
|
THE PEACOCK AND THE PANTHER PART 1: The Glass Summit by Commodore Stephen MacCaffery |
Island Chain Seven (“The Lanterns”), Tavrik III | |
|
The Golden Cage Part 2: The Edge of Detonation by Commodore Stephen MacCaffery |
Island Chain Seven (“The Lanterns”), Tavrik III | |
|
The Golden Cage Part 1: Paradise as a Powder Keg by Commodore Stephen MacCaffery |
Island Chain Seven (“The Lanterns”), Tavrik III | |
|
Touching Base by Vice Admiral Sidra MacLaren & Commodore Stephen MacCaffery |
Fleet Commander's Quarters, Starbase 369 / VIP Quarters Aboard the U.S.S. Valley Forge | |
|
THE STAGECRAFT OF PEACE by Lieutenant Pavel Khorev |
Island Chain Seven (“The Lanterns”), Tavrik III | |
|
THE VETHARI CHARM OFFENSIVE PART 5: DESSERT by Commodore Stephen MacCaffery |
Captain's Private Dining Room, USS Valley Forge | |
|
THE VETHARI CHARM OFFENSIVE PART 4: THE PIVOT by Commodore Stephen MacCaffery |
Captain's Private Dining Room, USS Valley Forge |
Mission Summary
Plot Summary: The Tavrik Accord
Dispatched by Vice Admiral Sidra MacLaren to mediate a volatile dispute on the ecologically scarred world of Tavrik III, Commodore Stephen MacCaffery finds himself navigating a powder keg. The Kaldari Union miners are trapped in a cycle of exploitative labor by the Vethari Combine, a monopoly that controls all export and trade. To prevent a sector-wide conflict, Stephen orchestrates a neutral summit on the isolated Island Chain Seven, also known as "The Lanterns". However, the fragile peace shatters when Kaldari Councilman Thess Kalon is assassinated during the "Breath of Welcome" ceremonial toast with a highly advanced, programmable toxin.
In the immediate aftermath, Stephen initiates a total planetary lockdown, trapping all delegations and transforming the diplomatic sanctuary into a sealed crime scene. To secure the airspace and prevent Vethari Envoy Sella Tharn from launching an orbital strike or extracting her people, the USS Tempest arrives to enforce a tight perimeter blockade alongside the USS Valley Forge.
As Stephen and his team investigate, Sella Tharn initiates a ruthless cover-up. The Vethari plant false digital evidence to frame Section 31 for the toxin and murder their own envoy, Kelok, with a modified phaser to frame Starfleet. Decrypting Kelok's logs reveals he was a defector trying to expose Tharn's true motive: utilizing the chaos on Tavrik III to cover up a massive weapons smuggling ring arming Romulan extremists.
Racing against time and mounting paranoia from Kaldari Governor Veln, JAG Commander Sarah Mackenzie boldly enters a Vethari warehouse to secure the physical shipping manifest proving the weapons smuggling. In a desperate bid to destroy the evidence, Tharn detonates a plasma charge that obliterates the warehouse. Mackenzie is critically injured in the collapse, but miraculously manages to save the isolinear chip containing the proof.
The act of terror forces Stephen to drop his diplomatic mask and assume his role as a JAG prosecutor. In a final, high-stakes confrontation amidst the ruined pavilion, Stephen corners Tharn with undeniable forensic evidence of her conspiracy. When Tharn attempts to order her flagship, the Gilded Hand, to burn the site from orbit, the USS Tempest decloaks and blocks the firing solution. Sella Tharn is arrested by Governor Veln for crimes against the Kaldari people.
In the aftermath, a newly forged bilateral treaty—the Tavrik Accord